Post Installation
Preparation
- Read Chapters 1 and 2 in the text.
Contents
Introduction
After installation, there are a number of things that need to be done
to make a system reasonably useable. There are lots of issues that could
be included here, but this is a minimal set. Some of these are related to
deeper issues that will be covered later.
Configuring the Startup Interface
There is nothing wrong with the graphical startup as long as things go
well with your X configuration. If not, you may not be able to boot.
Since you are going to be changing your system's configuration regularly
I recommend that you change the default boot behavior to the text
screen.
- Edit /etc/inittab.
- Find the line id:5:initdefault and change the 5
to a 3.
- When you reboot, you will terminate at a text screen login
prompt. You can login and then enter the startx command
to get your desktop running.
xdm
xdm is the X Display Manager, and represents a different operational mode
for the operating system. If you choose to run xdm, it becomes the login
manager for the init process. When you boot the machine, xdm runs and
presents a nice graphical logon screen. If you logoff, xdm presents the
login screen again. If you have X terminals or other X devices logging
in to your computer, they will also see the xdm interface.
- You can run xdm directly, but you would have to log on first, so that
isn't very practical.
- If you execute telinit 5, your system will be changed to
runlevel 5, which will start xdm. This is temporary until you
reboot, or run telinit 3.
- To make xdm your permanent run mode, edit /etc/inittab and
find the line id:3:initdefault: and change the 3 to a 5.
Then reboot and be ready for xdm to run. It would be wise to try
this with telinit before making it permanent. If you don't
try it, make sure your rescue disk is handy.
- There are some configuration options for xdm which will be covered
later - maybe.
Virtual Consoles
Linux supports the concept of virtual consoles - up to 63, and
the default is to define 6 of these. If you
boot up and log in, you will be a virtual console 1. You can change to
one of the other consoles by entering ALT-F(unction)-N, which
changes you to console N. F(unction)-N is one of the
function keys (F1 to F6) at the top of the keyboard. You can
also use CTRL-ALT-F(n), or use ALT-LEFT(RIGHT)-ARROW to cycle through
the available consoles.
In the newer versions of XFree86, these consoles also work under X,
so you can have a one or more non-X sessions running. However, you
cannot have more than one X server running at one time. Also,
if you change to a text console and back to X, you might find that
your graphics card has problems with this and doesn't get the
display quite right.
Information
The man pages are critical in solving many linux system administration
problems and you need to make sure they are available. Try typing
man ls (or any other command) to insure that the man pages
are working.
- /etc/man.config - this is probably properly configured, but if
some of your man pages aren't found, change this file. Usual
places are:
- /usr/man
- /usr/local/man
- /opt/*/man
- /usr/dt/man
- /usr/share/*/man
- /usr/X11R6/man
- /usr/bin/man
whatis database so that the man -k and apropos commands will work.
/usr/sbin/makewhatis will make the whatis database based
on the information in /etc/man.config. Again, this will probably
be setup. Enter man -k cat (or any other common Linux
command). If the result is a message saying that the whatis database
doesn't exist, then run makewhatis
Another useful tool is locate (or locate). To create the locate database
enter locate -u.
Network Configuration
First, you need to test your network configuration to see if it works
properly.
- If ping doesn't work
try ifconfig (below). If you don't see an eth0 device
you don't have the network device set up.
- ifconfig -a will show all the network interfaces configured
including lo, which is the local loopback. If you have a network
card and you don't see eth0, something is wrong. If you
don't see lo, something is seriously wrong.
- If the ping with an IP address works, ping with the DNS name,
e.g ping esus.cs.montana.edu. If the network is up, but this
doesn't work, then you don't have the DNS services properly
configured.
- At this point, the easiest solution is to use linuxconf
to get DNS working. Normally we will not use linuxconf because
it hides the important information that system administrators
need to know. However, in this case it is necessary if you
aren't going to reinstall.
Network Configuration with system-config-network
If you didn't get your networking properly configured during install,
or if networking comes along later, you can configure it manually (which
will be discussed later in the course) or you can use
system-config-network (RCN) or neat.
A warning is in order. While RCN can make certain system
administration tasks easier, you can also create some major problems
that are hard to find and fix. So use it carefully. If you ever
get confused about what you've done, abort the session and restart.
Run /sbin/system-config-network or /sbin/neat;
you should see the graphical interface for the network configurator.
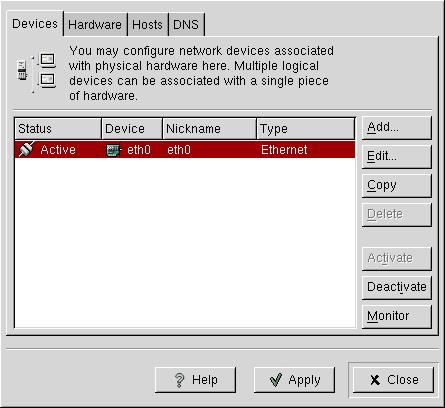
There are five tabs on the interface which allow you to configure five
things; the logical device, the interface card, the host information,
the IPSec policies and the Domain Name System.
Logical Device
This is the most critical part. You should see a logical device
named eth0 and its status should be active. If there is no logical
device you will need to add one using the add button, but that probably
indicates a major installation problem.
If you click on the eth0 device and then Edit, you will see the
following:
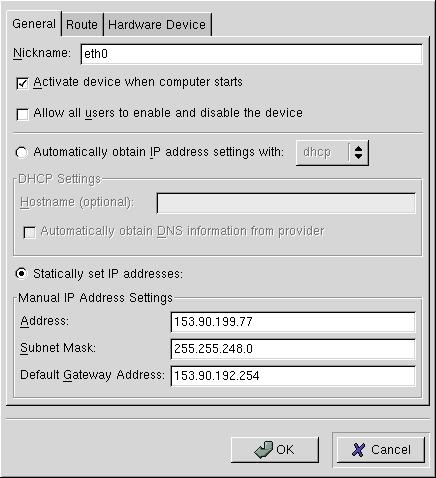
Check the Statically set IP addresses option and fill in your
IP address, subnet mask and default gateway address. Also, make sure that
the Activate device when computer starts box is checked.
Then you can close this box. You can also enter routing information, and
in the case of multiple network cards, the device here, but you don't need to
do this now.
Hardware
It is unlikely that you will want to try to configure the hardware, but this is
a place where you can provide special options that the driver can use.
Hosts
The hosts tab allows you to enter hosts that should be in your /etc/hosts
file. This file provides a fast way to lookup addresses without doing a
DNS lookup. It is essential that the 127.0.0.1 and your system's IP address
be included in the list. If they aren't, add them. You can also add other
addresses, such as printers or commonly used system names, but you don't have
to do this.
DNS
This tab allows you to enter a hostname and names of DNS servers.
Also, you can enter search paths. These are DNS suffixes to try if you type
in an unqualified name, such as telnet scalliwag.
Typically you enter your domain (cs.montana.edu), but you can enter other
domains that you commonly access.
IPSec
IPSec is an encrypted messaging system that can be used to set up
private tunnels. We won't do anything with this immediately.
Troubleshooting
If you have problems, first execute an ifconfig command and and
you will see something like this:
eth0   Link encap:Ethernet  HWaddr 00:01:03:C2:0E:35
       inet addr:153.90.199.101  Bcast:153.90.199.255  Mask:255.255.248.0
       UP BROADCAST RUNNING MULTICAST  MTU:1500  Metric:1
       RX packets:27896005 errors:0 dropped:0 overruns:1 frame:0
       TX packets:4310249 errors:0 dropped:0 overruns:0 carrier:0
       collisions:1437 txqueuelen:100
       RX bytes:3105608784 (2961.7 Mb)  TX bytes:682119662 (650.5 Mb)
       Interrupt:10 Base address:0xec00

lo     Link encap:Local Loopback
       inet addr:127.0.0.1  Mask:255.0.0.0
       UP LOOPBACK RUNNING  MTU:16436  Metric:1
       RX packets:290985 errors:0 dropped:0 overruns:0 frame:0
       TX packets:290985 errors:0 dropped:0 overruns:0 carrier:0
       collisions:0 txqueuelen:0
       RX bytes:58439473 (55.7 Mb)  TX bytes:58439473 (55.7 Mb)
If there is no eth0, you have no interface. If you have one, but the RX
and TX show no packets and/or errors, the device is there and
recognized, but not currently working. Using RCN, make sure that the
device is activated. If you have used RCN to modify
your configuration, try rebooting and then look in /var/log/boot.log
for the term eth0. If it shows up as succeeded, it should be working
but if not, you have hardware or driver problems.
If everything checks out, try pinging a host with the DNS name. If that
doesn't work, try it with the IP address. If that works then you have a
problem with DNS. Make sure that your DNS servers addresses are properly
set up.
If anything you try to do gets a Host unreachable message, then the
problem is with your default gateway. Make sure the configuration is
correct with RCN. For some reason, you may need to reboot if you change
the default gateway in order to have it recognized.
Configure Root
The root account needs to be carefully configured. You should run BASH
as the shell, although that is a somewhat personal choice. You need
to set up a path for the root user and whatever aliases and other
characteristics you want in the ~root/.bashrc file.
- Never put "." in root's path - EVER.
- You do want /sbin, /bin and /usr/sbin for certain.
- The root interface should be spartan. Minimize aliases and
helper types of things. If you give lots of hints to
people that might break-in to your system it can work to
your disadvantage.
- You should turn on history for root and keep 100 or more commands.
Its nice to have a record of your mistakes. There is a downside to
this sense an intruder might be able to ferret-out information you
don't what them to have.
set history = 100 # for cshrc
  export HISTSIZE=100        # for bash, sh, ksh
  export HISTFILE=~/.history
  export HISTFILESIZE=500
Make the password a good one - at least 9 characters,
at least one case change, at least one special character and
at least one digit, or something that is equally random.
Permissions on ~root should be 700 (u+rwx,g-rwx,u-rwx).
Set the umask in .bashrc to 077, so that the default for
files created will be access by root only.
Boot Loader Configuration
Every system needs a boot loader that is initially stored in memory and
which then reads the operating system from disk and executes the initialization
procedures. There are two possible choices for Red Hat 8.0 -
LILO and GRUB.
GRUB
GRUB (GRand Unified Boot loader) is a generic type of boot loader that
can handle many different operating systems and multiple boot systems
seamlessly. To configure GRUB, you modify the file /etc/grub.conf which
is simply a link to /boot/grub/grub.conf. You will notice that the file
/boot/grub.conf/menu.lst also points to grub.conf. That's because
the normal configuration file for GRUB is menu.lst but the Fedora folks
like this other naming scheme.
Under most circumstances, you won't have to modify this file at all since
the install process asks questions that provide the necessary information.
But you might change your mind about something.
A couple of notes:
- Unlike LILO, you don't have to execute a command if you change
/etc/grub.conf.
- Since GRUB uses password encryption, the permissions on the
configuration files can allow read access to non-root users.
An example grub.conf file is:
# grub.conf generated by anaconda
#
default=0
timeout=10
splashimage=(hd0,0)/boot/grub/splash.xpm.gz
password --md5 $1$�����hTz$TLu30NG9eNEqP88d7nOlG.
title Fedora Core (2.6.10-1.770_FC3)
root (hd0,4)
kernel /boot/vmlinuz-2.6.10-1.770_FC3 ro root=LABEL=/
initrd /initrd-2.6.10-1.770_FC3.img
title Windows
root (hd0,0)
chainloader=(hd0,0)+1
- The default tag indicates which of the titles is to be the
default operating system.
- timeout specifies the delay before booting the default.
- splashimage gives the location of the file that is displayed
at the boot prompt.
- password specifies a password to be entered to boot a system.
The records starting with title describe operating systems that
can be booted by grub. In this case, there is one operating system which is:
root (hd0,4)
This specifies that the root file system for the operating systems
is on the first hard drive (hd0) and the fifth partition of this
drive (4). Note that GRUB assumes that all numbering starts
at 0, so this is actually partition hda5.
kernel /boot/vmlinuz-2.6.10-1.770_FC3 ro root=LABEL=/
This specifies that the location of the kernel image to boot which is
in /boot on the root device. makes it read only. The root
option is unnecessary but specifies the location of the root directory
(in Linux terms, not GRUB)
If you see rhgb at the end of the kernel line, it means that the Red Hat
Graphical Boot is to be used. This tells Grub what to do about
the graphical startup, but removing it does not stop the system from
booting to a graphical startup, only the form that you will see.
initrd /initrd-2.6.10-1.770_FC3.img specifies the file to use
as an initial ram disk. The short answer is that any
drivers that have to be preloaded to get things going will be put in this
file. For example, if you need a SCSI driver before the disk can be
read.
chainloader +1
This tells GRUB to get the operating system loader for Windows
from the first sector of the current partition, which is defined
at (hd0,0) which is hda1. This allows GRUB to boot some other
operating system even if it doesn't know anything about the operating
system itself.
To actually configure GRUB, you can manually edit this file, or you
can run grub, which has more than 40 different commands. For the
time being, you might be interested in adding a password to your
GRUB boot. You can do this with:
This assumes that you want your password to be encrypted, which you do.
There are of course many other things that you can do and some will be
discussed later.
LILO
LILO stands for Linux Loader, and it is the program that can boot
Linux and other operating system. There is quite a bit to LILO,
but the simple version is this:
LILO is a boot manager or boot loader. There are lots of these around
but LILO is the standard for Linux.
LILO operation is controlled by /etc/lilo.conf.
If you change lilo.conf or your kernal configuration, you have
to execute the LILO command in order for the changes to be known
by the boot loader.
The permissions on lilo.conf should be 700 or 600.
An example lilo.conf file is:
   boot="/dev/hda"                 # name of partition containing boot sector
   map=/boot/map                   # map file containing the map
   install=/boot/boot.b            # boot sector image to install
   prompt                          # forces prompt for boot option
   timeout="25"                    # time before taking default
   message=/boot/message           # message to display before prompt
   linear                          # linear addresses rather than s/h/c
   default=linux                   # default boot image

   image="/boot/vmlinuz-2.4.2-2"   # define image and kernal file loc
           label="linux"           # LILO prompt
           read-only               # mount root read-only
           root="/dev/hda1"        # root device
           append="hdd=ide-scsi"   # append the given option string
Each of these statements tells LILO something about your boot-up
configuration. We will discuss LILO more later and the man pages
for lilo and lilo.conf are quite complete.
One option that is handy is the password option:
If present, it tells LILO not to allow a boot request until the
password is entered. This will not stop someone with a floppy disk
from booting the system if it is properly configured.
Rescue Disk
The boot disk that you make is designed to boot the system that you have
installed. It will not boot your system unless you have the Linux
kernel and file system on a hard drive. This isn't much help if your
installation is corrupted by bad fortune or active stupidity (it
happens). What you need for that is a bootable Linux floppy or CD,
which is a self-contained Linux system not an install set. You can boot up to
a running Linux system
without any other support, and then you can
access your hardware to make changes. In times past, an
image for the rescue disk was included in the images directory of
your installation CD, but not in later versions of Red Hat.
For more information check out this
page.
Installing Software
Software Install HowTo

