

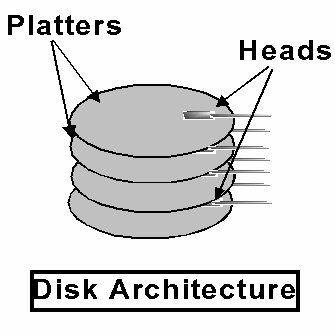
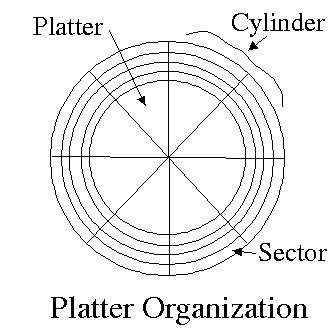
A cylinder is a single track on a hard drive through all of the platters. Often the two terms are used interchangeably.
For example, a Maxtor 91303D6 13 gigabyte drive has 16383 cylinders 16 heads and 63 sectors for a total of 16,514,064 sectors. These are ostensibly 1024 byte sectors, but some space is wasted. Also, drives can be addressed differently due to onboard translation.
IDE (Integrated Device Electronics) drives can show a variety of different structures by interpreting the addresses.
The addressing for these drives can be determined arbitrarily, but we will assume that when addressing a particular sector, counting will begin with C(ylinder) 0, H(ead) 0, and S(ector) 1, or CHS = 0,0,1. Then, succeeding sectors will be CHS = 0,0,2, then 0,0,3, ... 0,1,1, 0,1,2, ... 1,0,1 and so on.
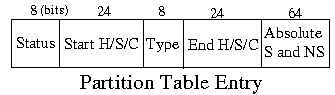
When a machine is started, the firmware bios know where to find this information. It loads it into memory, and executes the master boot program. The layout of the MBR is:

The LILO boot program is an example of a program that might be found here.
The partition table has a maximum of four 16-byte entries of the form:
LBA is important because it removed the 1024 cylinder limit for the location of a partition. ATA-2 incorporated LBA and rid the industry of a significant limitation. When you are partitioning a hard drive and see a warning about a partition that exceeds the 1024 cylinder limit, you only need to worry if it is using ATA-1 or earlier hard drive technology.
A simple boot program looks through the partition table for the active partition (there can only be one) and boots that partition. More sophisticated boot managers (LILO, GRUB, NT Boot Manager) can handle multiple boots by reading disk files that contain additional information concerning bootable partitions.
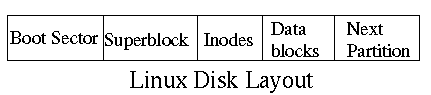
After the boot sector, the remainder of the the first cylinder CHS = 0,0,2 through 0,0,n is unused and the first sector on the second cylinder, CHS = 0,1,1, begins the operating system portion of the disk. Depending on the operating system this can vary, but in general, it contans a boot sector for the operating system itself, information about the file system, and finally, data.
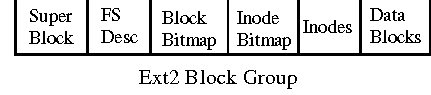
ext2 has a particular disk layout that it uses as does every operating system and/or file format within an operating system. While there is some variation, a Linux file system looks basically like this:
A superblock is actually quite complex and this is only an overview. You can look at the various C structures for the superblock and other ext2 filesystem entities in /usr/include/linux/ext2_fs.h.
In modern systems, it is much to inefficient to keep all of the inodes at the beginning of a partition, so block groups are created which organize smaller parts of a partition so that the inodes related to groups of blocks are kept locally. A block group structure is:
The basic unit of structure for an ext2 filesystem is an inode which has the following format:
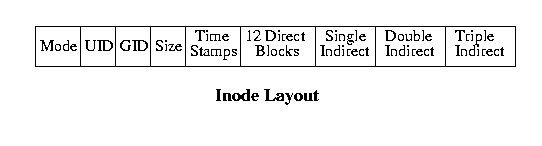
There is actually quite a bit of additional information stored in the inodes of an ext2 file system which is more relevant to a course in operating systems.
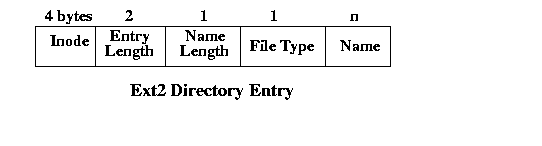
A directory in an ext2 file system is simply a file with the directory mode bit set. So when you create a directory, it allocates everything just like a regular file. When you add files to the directory, each file is provided an entry in the directory file with this format:
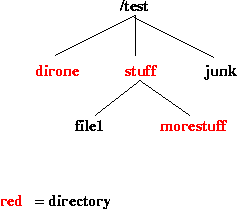
Consider the following directory tree, where the partition is mounted on /test.
Assuming that nothing else is going on with the disk, and that the files were created in a breadth-first order that the first data block is block 1000, the inodes will be:
| Inode | Type | Size | Direct Pointers | Indirect |
|---|---|---|---|---|
| 1 | dir | 1024 | 1000 | |
| 2 | dir | 1024 | 1001 | |
| 3 | dir | 1024 | 1002 | |
| 4 | file | 20 | 1003 | |
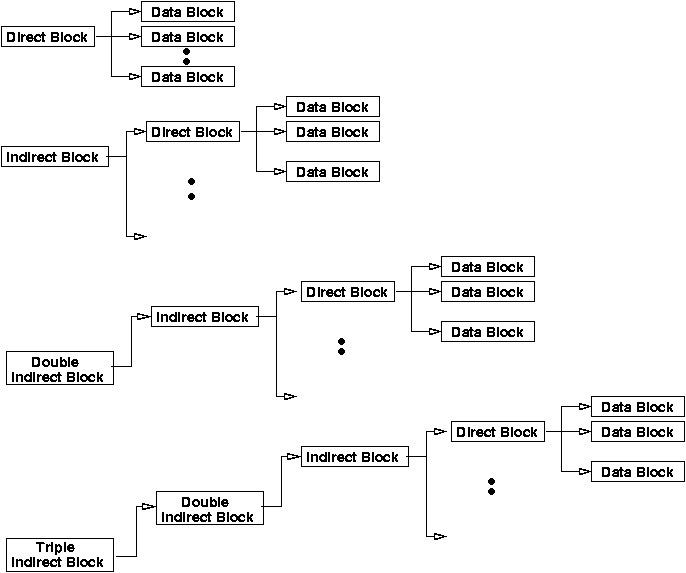
| 5 | file | 15,814 | 1004-1015 | 1016 |
| 6 | dir | 1024 | 1021 |
Block 1000 is the top level directory pointed to by inode 1. Note that inode 0 indicates that a reference is beyond the top of the partition mount point. Abbreviating the inode entries, the block contents are:
| Inode | Name |
|---|---|
| 0 | .. |
| 1 | . |
| 2 | dirone |
| 3 | stuff |
| 4 | junk |
Similarly block 1001 is the dirone directory:
| Inode | Name |
|---|---|
| 1 | .. |
| 2 | . |
Block 1002 is the stuff directory:
| Inode | Name |
|---|---|
| 1 | .. |
| 3 | . |
| 4 | file1 |
| 5 | morestuff |
Block 1003 is the file junk data block. Junk only contains 20 bytesk so 1003 has 20 bytes of data and nothing else.
| Data |
|---|
| 12345678900987654321 |
Blocks 1004 through 1015 are the first 12 data blocks for the file named file1. Since it is longer than 12 times 1024 bytes, it also has an indirect block, 1016, which has pointer to the first set of indirect blocks. Since it will take an additional four blocks to store the 15,814 - 12,288 = 3526 bytes, it will have four addresses in it:
| Contents |
|---|
| 1017 1018 1019 1020 |
Each of the blocks (1017 - 1019) will have 1024 bytes of data, and 1020 will have the remaining bytes.
Finally, block 1021 contains the directory for morestuff:
| Inode | Name |
|---|---|
| 3 | .. |
| 6 | . |
Normally, directory trees don't get built sequentially like this, and files have a tendancy to grow and shrink, so the block assignments for a file are not usually in order.
mount - the linux mount program
The options on mount are many and can be confusing, but normally you don't need much. A typical mount looks like this:
mount -t type device dir
For example,
| mount -t ext2 /dev/fd0 /mnt/floppy | mount a floppy disk. The floppy drive should contain a floppy disk that has been formatted for the Linux ext2 file system and /mnt/floppy must exist. | |
| mount -t msdos /dev/hdc4 /mnt/zip |
The zip disk is the third IDE device. The zip driver
assumes that the zip disk is the fourth partition.
(I can't explain). The zip disk has been
formatted for MSDOS/Windows and it should be mounted at
/mnt/zip.
| |
| mount -t iso9660 /dev/cdrom /mnt/cd |
Mount the file system on the cdrom at /mnt/cd.
iso9660 is the standard cd file system format.
| |
| mount -t msdos /dev/hda1 /Windows | Mount partition 1 on /dev/hda at /Windows, and it should be
formatted as an msdos file system of some sort.
| |
| mount -a | Mount everything in in /etc/fstab that has the automount flag set |
mount will complain if the file system isn't the correct type, or if you don't get the mount point correct. There can't already be something there. Look at the man page for mount to see a list of all the possible file system types.
There are many file systems that Linux mount will handle, but the ones of most interest are:
| adfs | Advanced File System | |
| autofs | Automount | |
| coda | The Coda file system | |
| ext | Old Linux format | |
| ext2 | New Linux format | |
| iso9660 | CD format | |
| msdos | DOS/Windows format | |
| nfs | Network File System | |
| ntfs | NT File System | |
| smbfs | Samba File System | |
| ufs | Unix File System |
Some other options that you may use from time to time:
| -a | mount everything. Typically only used if your are troubleshooting and are running by virtue of a floppy boot up or some other strange occurrence. If you aren't root, or /etc is read only, use mount -an. | |
| -r | mount the file system readonly; also -o ro. | |
| -o rw | mount the file system read-write; also -w. | |
| -fv | Output what the mount command would do, but don't actually perform any operations. | |
| -o sync | Do I/O synchronously so that writes are performed immediately rather than cached. | |
| -o noauto | Must be mounted explicitly, no automount. | |
| -o user | Allow ordinary user to mount |
A new trick in the 2.4 and later Linux kernels is the use of volume labels. Instead of mounting /dev/hda4, you can give /dev/hda4 a volume label and then mount using the label. For example, mount /usr instead of mount /dev/hda5. These labels are set using the e2label command or when building with mke2fs. By default, Red Hat 8.0 uses labels in the fstab file as well, so if you need to see the actual devices, enter mount without any parameters.
To export a file system so that it can be NFS mounted, you edit the file /etc/exports and enter a record of the form:
For example,
| /home/bozo | Allow anyone to NFS mount this
directory.
| |
| /home/bozo clowns (ro) | Allow the host named
clowns on the local network to mount the directory read-only.
| |
| /home/bozo clowns (ro) lab*.clownnet.org (rw) | As before, but also allow any host matching lab*.clownnet.org
to mount it read-write.
| |
| /home/bozo 168.1.128.0/255.255.252.0 (ro) | As before, but opened to a subnet.
| |
| /home/bozo (anonuid=1000,anongid=150) | Allow anyone to mount this, but map all requests to uid 1000 and
gid 150, so that they all appear to come from the same user.
This is handy and possibly necessary if users have different
uid's and gid's on different systems.
| |
| /home/bozo clowns(rw, all_squash) | Mount read-write for clowns and make all uid's and gid's
the same as the user named anonymous (which must exist)
| |
| /home/bozo (sync, insecure) | Normally writes are done asynchronously but this changes it to synchronous and insecure allows clients using ports above 1024 to mount this directory, which is dangerous. |
Unmounting is very simple. You can specify either the device or the mount point, if the mount point is listed in /etc/fstab.
umount /mnt/floppy
Remember that under Linux, data written to a removable device may not be written unless you unmount it properly or mount it with the sync option. So, mount the device, write to it and then umount it before removing it. If you remove it without unmounting, plan on doing the process again, and possibly with a reboot because it thinks the device is busy. The eject command will unmount and then eject the device for most removable devices.
automounting systems may help here, but only if the system is able to control the actions associated with the mechanical eject.
| Device | Mount Point | Type | Options | Dump | Order | |||||
|---|---|---|---|---|---|---|---|---|---|---|
| /dev/hda1 | / | ext2 | defaults | 1 | 1 | |||||
| /dev/hda6 | /home | ext2 | defaults | 1 | 2 | |||||
| /dev/cdrom | /mnt/cdrom | iso9660 | noauto,owner,ro,user,exe c,dev,suid | 0 | 0 | |||||
| /dev/hda5 | /usr | ext2 | defaults | 1 | 2 | |||||
| /dev/hda7 | swap | swap | defaults | 0 | 0 | |||||
| /dev/fd0 | /mnt/floppy | ext2 | noauto,owner,user,exec,d ev,suid | 0 | 0 | |||||
| /dev/fd0 | /mnt/dosfloppy | vfat | noauto,owner,user,exec,d ev,suid | 0 | 0 | |||||
| none | /proc | proc | defaults | 0 | 0 | |||||
| none | /dev/pts | devpts | gid=5,mode=620 | 0 | 0 | |||||
| /dev/hdd4 | /mnt/doszip | vfat | noauto,owner,rw,user,exe c,dev,suid | 0 | 0 | |||||
| /dev/hdd4 | /mnt/zip | ext2 | noauto,owner,rw,user,exe c,dev,suid | 0 | 0 | |||||
| clowns:/home/bozo | /home/bozo/nfs | nfs | defaults | 0 | 0 |
If you want to allow ordinary users to mount devices, you can put that information in fstab, even if the devices are not always mounted. For example, if you wanted a user to be able to do an NFS mount when needed, you could put the following in your fstab:
Any user with permission to access /users/bozo/csfiles can perform the mount by entering:
If you want to automount removable storage devices like zip disks and CD-ROMS, you need to run the autofs daemon at system startup. It will read /etc/auto.master which describes mount points that are to be automounted. If an access is attempted on one of those mount points, it will attempt to mount the device. If the device is not used for a certain period of time, it will unmount it.
auto.master sets up the mountpoints for autofs. Each line describes a mountpoint and the file that describes the specific file systems for the mountpoint. For example,
/vol /etc/auto.vol --timeout=10
Describes the /vol mountpoint which is further described in /etc/auto.vol. The timeout value is the wait time until an attempt to automount is aborted. For example, if you put a CD in your reader and attempt to read it, after 60 seconds the automounter will give up. The automounter also unmounts devices after a period of inactivity (typically 600 seconds). If it auto-unmounted and then the device is accessed again, autofs will try to remount it.
auto.vol describes the things that will be mounted on /vol. For example,
   cdrom       -fstype=iso9660,ro,nosuid,nodev   :/dev/cdrom  #dvd
   cdrom1      -fstype=iso9660,rw,nosuid,nodev   :/dev/cdrom1 #cdrw
   zip         -fstype=auto,rw,sync,umask=002    :/dev/hdd4   #zip
   floppy      -fstype=auto,rw,sync,umask=002    :/dev/floppy #floppy
describes the mount properties for a dvd, cd-rw, zip and floppy disk. Why not simply use /mnt. There isn't a specific reason, but /mnt is used for other things and in order to prevent conflicts, its not a bad idea to put the auto mountpoints somewhere else.
Two other files of interest are /etc/mtab and /proc/mounts. Both of these files contain the information about the currently mounted file systems and are very similar. It appears that at some point in time the traditional /etc/mtab file will be completely replaced by /proc/mounts.
The root of your filesystem tree is /proc/mounts that has a list of all of the mounts. Any absolute pathname (starting with a /) begins by finding the correct filesystem to use.
fdisk - the traditional linux paritioning program
   Disk /dev/hda: 255 heads, 63 sectors, 1021 cylinders
   Units = cylinders of 16065 * 512 bytes

      Device Boot    Start       End    Blocks   Id  System
   /dev/hda1   *         1       128   1028128+  83  Linux
   /dev/hda2           129      1021   7173022+   5  Extended
   /dev/hda5           129       575   3590496   83  Linux
   /dev/hda6           576       958   3076416   83  Linux
   /dev/hda7           959      1021    506016   82  Linux swap

   Command (m for help):
sfdisk - a more sophisticated partition program based on DRDOS, a popular MSDOS product. More options, and basically the same results. However, it requires that you unmount the drive before starting.
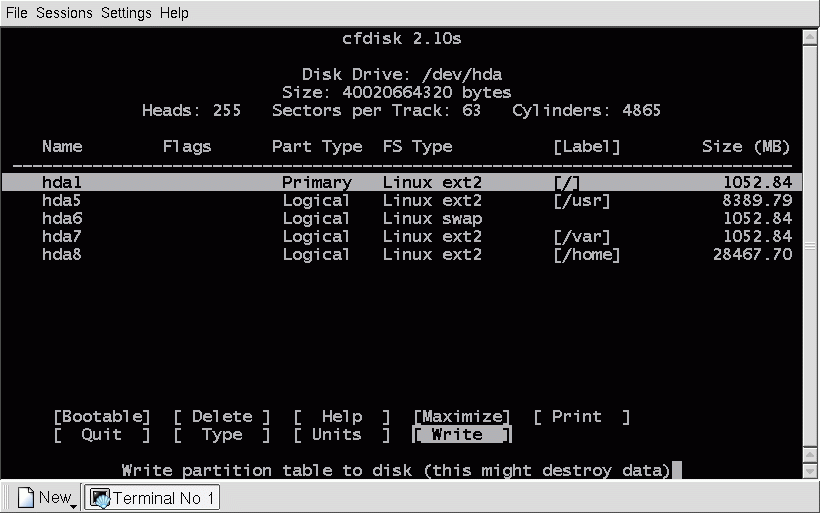
cfdisk - a curses based (sort of graphical) partitioning tool. Easier to use and easier to screw up if you aren't careful. It displays a list of partitions and their parameters and then provides commands to:
| Bootable - Make a partition bootable |
| Delete - Delete a partition |
| Maximize - Maximize the size of a partition |
| Print - Print to screen or file |
| Type - Set the partition type |
| Units - Change the display units |
| Write - Write partition table |
The interface looks like this:
People familiar with the Windows partitioning program Partition Magic will appreciate parted, which does the same functions for free. Theoretically partitions are not operating system dependent, so its really a matter of what the software runs on.
parted comes from the fine folks at GNU and will allow you to create, destroy, resize, move and copy ext2, FAT and FAT32 partitions without the loss of data (obviously not if you destroy something). They always warn you to backup your data and since they wrote the software, that's probably good advice. parted is easy to use and very fast. Like Partition Magic, it saves a bunch of operations and then updates all at once. Unlike PM, parted does not have a graphical interface, and in fact, is the backend processor for DiskDruid which you used to partition your hard drive during installation.
If you use Partition Magic (probably from a DOS boot floppy) be a little careful. PM saves a list of operations and performs them all when you apply the changes (although it appears that the are being done in real-time in the interface). If you are going to do quite a few things, it is best to do a couple, let PM perform the operations and then do a couple more things and so on, rather than building up a backlog of operations. Experience says that this will prevent potential problems resulting in data loss, heartbreak, unemployment, depression and/or someone tatooing moron on your forehead.
A file system is created with mkfs command, which has the format:
There are a number of specific commands to make this easier, such as:
These commands have a wide variety of specific options for the file system type. Normally, the defaults are reasonable.
Some examples are:
Both create a default ext2 file system on the 6th partition on /dev/hda. Anything on this disk is history, so be careful.
mkfs -t msdos -F32 -nWindows -r1024 -s64 /dev/hdb1
mkdosfs -F32 -nWindows -r1024 -s64 /dev/hdb1
Both create a dos file system with volume name Windows, 32-bit fat tables, 1024 root directory entries and 64 sectors per cluster.
mke2fs /dev/hdc4
Create a zip disk (probably) on the fourth IDE device with an ext2
file system.
Once the file system is created, it is ready to be mounted and used.
File permissions are the mechanism used by Unix in general and Linux to control file access. The file permissions are organized by types of user and types of access.
These permissions represent a 12-bit value that is organized in the following way:
| Bit | Permission | |
|---|---|---|
| 0 | Set-uid bit | |
| 1 | Set-gid bit | |
| 2 | Sticky bit | |
| 0 | Owner read | |
| 0 | Owner write | |
| 0 | Owner execute | |
| 0 | Group read | |
| 0 | Group write | |
| 0 | Group execute | |
| 0 | User read | |
| 0 | User write | |
| 0 | User execute |
The program for setting file permissions is chmod. The syntax is:
Because the permissions are a bit map, you can set the permission
| Command | Owner | Group | User | Uid | Gid | Sticky | |
|---|---|---|---|---|---|---|---|
| chmod 644 | rw_ | r__ | r__ | _ | _ | _ | |
| chmod 755 | rwx | r_x | r_x | _ | _ | _ | |
| chmod 6700 | rwx | ___ | ___ | s | s | _ |
Or you can use key letter, as indicated above.
| Command | Owner | Group | User | Uid | Gid | Sticky |
|---|---|---|---|---|---|---|
| chmod o+rw gu+r | rwx | r__ | r__ | _ | _ | _ |
| chmod o+rwx gu+rx | rwx | r_x | r_x | _ | _ | _ |
| chmod o+rwx og+s | rwx | ___ | ___ | s | s | _ |
When files are listed with ls -l, as shown below, the permissions are shown as foooggguuu, where f indicates a file is a regular file, a link, a device or a directory. The other groups are the permissions for owner, group and user respectively. There is no room for the setuid and setgid bits, so they replace the x bits for owner or group as shown in the last entry.
   drwxr-xr-x   3 bozo   user       8192 Aug 31 15:04 .
   drwxr-xr-x   8 bozo   clown       8192 Sep 12 10:28 ..
   -rw-r--r--   1 bozo   clown       1044 Aug 31 15:04 asgn1.html
   -rw-r--r--   1 bozo   clown        901 Sep 13  1999 asgn2.html
   lrw-r--r--   1 bozo   clown         10 Sep 18  2000 link -> asgn1.html
   -rwSr-Sr--   1 bozo   clown        456 Sep 18  2000 text.txt
Setting File Ownership

File ownership has two parts - the owner and the group of the owner.  If you
list your files with the command ls -l, you will see something of the
form:
   total 43
   drwxr-xr-x   3 bozo   clown       8192 Aug 31 15:04 .
   drwxr-xr-x   8 bozo   clown       8192 Sep 12 10:28 ..
   -rw-r--r--   1 bozo   clown       1044 Aug 31 15:04 asgn1.html
   -rw-r--r--   1 bozo   clown        901 Sep 13  1999 asgn2.html
   -rw-------   1 bozo   clown       1485 Sep 24  1998 asgn2.txt
   -rw-------   1 bozo   clown        992 Nov 10  1998 asgn8.html
   drwx------   4 bozo   clown       8192 Aug 29 10:13 old
   -rw-------   1 bozo   clown       2217 Dec 14  1998 project.html
   -rw-------   1 bozo   clown       1829 Sep 24  1998 users.html
After the permissions and the file size in blocks there are two names - the first is the owner identifier and the second is the owner group. You cannot change your user id, but you can belong to several groups and you can set your current group with the newgrp command.
Only the root user can change the ownership of a file. This is done with the command:
For example,
Users can change the group, but only files that they own, and only to a group that they belong to, as described in /etc/group.
| Directory | Use |
|---|---|
| /boot | boot up things; the kernel and lilo info |
| /bin | basic system support binaries |
| /dev | device files |
| /etc | configuration and host specific files |
| /home | user home directories |
| /lib | libraries and kernel modules |
| /mnt | removable device mount points |
| /opt | add on packages |
| /proc | special files related to the current execution environment |
| /root | root home directory |
| /sbin | system administration binaries |
| /tmp | temporary files |
| /usr | files that are common between machines (usually) |
| /var | files that change regularly - print queues, mail queues, logs |
There are a few tools that can be quite useful in solving problems with file systems and disk drives, or just for collecting information.
The file command attempts to determine the type of a file. To do this, it tests what the filesystem knows, then it checks for magic numbers in the files, and finally, it reads the file data to try and figure it out. This is a fairly complicated process, but it is accurate an large percentage of the time. The operation of file depends on the contents of /usr/share/magic and /usr/share/magic/magic.mime which contain information about various file types that file uses.
Syntax: file [options] file [file] ...
Important Options:
| Option | Meaning | |
|---|---|---|
| -b | Don't prepend the file name | |
| -f namefile | Read the names from a namefile (one per line) | |
| -i | Output the names as MIME types | |
| -n | Flush stdout after each name (useful when piping output) | |
| -z | Try to look inside compressed files |
stat is the foundation program for files, as it returns the filesystem information about a file
Syntax: stat [options] filename [filename] ...
Important Options:
| Option | Meaning | |
|---|---|---|
| -f | stat the filesystem where the file is located instead of the file | |
| -t | Terse output mode |
fsck is the general purpose file system check and repair utility and e2fsck is fsck for a file system of type ext2 (and ext3) but with more options. Since ext2 filesystems are the most common, it will be discussed here. e2fsck and fsck will check and possibly repair a file system. The fsck programs should only be run on unmounted file systems; forcing a repair could damage the system as mounted file systems are dynamic.
Syntax: e2fsck [options] [fsck-option] filesys [...]
Important Options:
| Option | Meaning | |
|---|---|---|
| -B blocksize | Specify the blocksize. Normally e2fsck will try to figure it out. | |
| -c | Run the badblocks program and add them to the list. | |
| -f | Force checking even if file system appears OK. | |
| -p | Automatically repair |
This command prints the superblock and blocks group information for the file system on a device. dumpe2fs program should only be run on unmounted file systems.
Syntax: dumpe2fs [options] device
Important Options:
| Option | Meaning | |
|---|---|---|
| -b | Print the bad blocks list | |
| -oB blocksize | Specify a blocksize | |
| -f | Force a dump even if not completely understood | |
| -h | Dump superblock only |
debugfs allows you to debug a file system. It is dangerous in that it allows you to manually change the state of an ext2 file system, but it is quite handy when you have to have it. You must be superuser to use dumpe2fs.
Syntax: debugfs [options] device
Important Options:
| Option | Meaning | |
|---|---|---|
| -w | Open in read-write mode | |
| -c | Open in catstrophic mode - don't use the inode or block group bitmaps | |
| -b blocksize | Set the blocksize |
debugfs is an interactive program with the following set of commands.
Important Commands:
| Command | Meaning | |
|---|---|---|
| cat filespec | Dump the inode of filespec. | |
| cd filespec | Change current directory to filespec. | |
| close | Close the currently open file system. | |
| clri file | Clear the contents of inode file. | |
| dump filespec file | Dump the contents of inode filespec to file. | |
| feature [fs][-fs] | Set or clear superblock features | |
| find_free_block [goal] | Find the first free block starting from goal. | |
| find_free_inode [dir [mode]] | Find a free inode and allocate it. dir is a directory where the inode is to be allocated and mode specifies the permissions. | |
| freeb bl | Mark the block number bl as not allocated. | |
| freei filespec | Free the inode filespec | |
| icheck block ... | List the inodes that use one or more of the blocks specified. | |
| lsdel | List all deleted files | |
| mkdir filespec | Create a directory | |
| ncheck inode_num ... | Print a listing of the pathnames that resolve to the given inode. | |
| open [options] device | Open a file system for editing. | |
| pwd | Print the current working directory | |
| rm pathname | Unlink a pathname | |
| rmdir filespec | Remove the directory filespec | |
| setb block | Mark block as allocated | |
| seti filespec | Mark filespec as allocated | |
| stat filespec | Display the contents of the inode filespec | |
| testb block | Test to see if block is allocated | |
| testi block | Test to see if inode is allocated | |
| write source_file out_file | Copy source_file to out_file | |
| rdump dir dest | Recursively dump dir and its contents to dest. |
As you can see debugfs is a powerful tool for fixing and (or destroying) file systems. Use it with care. The examples show a few of the possible uses.
Related Tools
Dump 10 blocks, starting at block 1535, with a block size of 4096 to the file.
tune2fs allows you to modify the tuneable parameters on a file system of type ext2. You must be superuser to run tune2fs and the filesystem should be unmounted if you make changes.
Syntax: tune2fs [options] device
Important Options:
| Option | Meaning | |
|---|---|---|
| -c max-mount-counts | max counts between fsck's | |
| -e error-behavior | Change the error behavior to continue, remount-to, panic, | |
| -i max-interval | max interval between checks | |
| -l | List superblock contents (same as dumpe2fs -h) | |
| -m pct | Reserved block percentage | |
| -r count | Reserved block counts | |
| -L string | Set the volume label |
Switches:
| Switch | Meaning | |
|---|---|---|
| c | Create archive | |
| d | diff archive and file system | |
| r | Append to an archive | |
| t | List archive contents | |
| u | Update an archive | |
| x | Extract files |
Modifiers:
| Switch | Meaning | |
|---|---|---|
| --atime-preserve | Preserve access times on files | |
| b N | set the block size | |
| f F | Use file F rather than /dev/rmt0 | |
| h | Dump links, not files they point to | |
| --bzip | Filter through bzip | |
| --gzip | Filter through gzip | |
| p | Keep permissions | |
| --remove-files | Remove the files after adding to the archive. | |
| --same-owner | Keep the ownership the same when extracting. So if the owner of the files is xxx, but the file is extracted by root, the files as restored will have ownership xxx, not root. | |
| T F | Get the files to extract or create from file F. |
There are aliases for many of these commands - look at the man page.
This unique syntax causes dump to backup filesys using options and at the dump level specified by the value -0 ... 9. A level of 0 causes a full backup of all files. A level greater than 0 causes a backup of all files new or modified since the last dump at a lower level. The default is 9.
Options:
| Options | Meaning | |
|---|---|---|
| -B | The number of 1 KB blocks per volume | |
| -a | Automatically size the media by waiting for and end-of-media indication. | |
| -b blocksize | Specify the the number of kilobytes for dump record. | |
| -h level | Honor the no dump flags for dump levels greater than level. | |
| -f file | Specify the backup file/device. | |
| -M | Enable multi-volume | |
| -n | If a dump requires operator attention, notify everyone in the oper group. | |
| -u | Update /etc/dumpdates when a dump is successful. |
A backup plan should always start with a level 0 dump and a full dump should be done regularly - one per month for example, and on a fresh set of tapes. Then perform incrementals with gradually increasing level numbers until the next full. A commonly suggested sequence of levels is: 3 2 5 4 7 6 8 9 9.
restore is the program to restore dumped files. It can be run in batch or interactive mode. The interactive mode commands mirror the batch execution options, so the interactive mode will be discussed here. When using restore interactively, you are presented with the file system as it exists on the dump (tape, file, ...) and have the opportunity to pick the files to restore.
Options:
| Commands | Meaning | |
|---|---|---|
| add D | Add D (file or directory) to the recover list. | |
| cd D | Make D the current directory. | |
| delete D | Delete D (file or directory) from the restore list. | |
| extract | Extract files on the restore list from the dump. | |
| ls | List the current directory. | |
| pwd | Show the current directory. | |
| quit | Quit. | |
| setmodes | Set the modes, ownership and times for the files to be restored. |
rsync can be used to mirror disks or to provide a dynamic backup or failover system.
Create a directory in some location and put a few files in it. Use debugfs to look at the file system structure in this directory. In particular, do a dump of the directory itself and look at it using od or xxd. Now delete one of the files and do another dump. Figure out what happened with the directory structure. If possible, recover the file. If you can't unmount your file system, make sure that you put your dump file in some other directory so that it doesn't modify the directory you are trying to analyze. Now try to recover the file. Another thing you should try is to dump a data block to a file.