![]()
![]()
The Biofilms Hypertextbook Project utilizes the latest Java technology to make it possible to include active learning models and tools seamlessly within the hypertextbook. Thus, in order for you to be able to use all of the features of the hypertextbook, you must ensure that the computer you use to view the hypertextbook meets the following system requirements. In overview please note that you will need to have installed on your computer
|
a recent version of either Microsoft Internet Explorer or Netscape (or both) | |
|
a recent version of the Java Runtime Environment (JRE) | |
|
Java Media Frameworks (JMF) | |
|
Java Advanced Imaging (JAI) |
If you are an experienced computer user, you can probably complete the configuration on your own. Others should click one of the following to proceed.
If you prefer to use Internet Explorer as your browser, read this section. Otherwise skip to the section on Netscape.
If you prefer to use Microsoft Internet Explorer, you must have version 6.0 or higher installed (in fact, it is generally a good idea to keep your browser up to date in any case). Navigate to
to obtain the latest version.
In order to run the Java applets of the hypertextbook project you will need the Java Runtime Environment (JRE) plugin from Sun Microsystems. If you do not already have version 1.4.0 or higher installed on your computer you can navigate to
to obtain the latest version of the JRE. Follow the installation procedures provided on that site.
After installing the
JRE (or if you already have a satisfactory version installed) be sure that
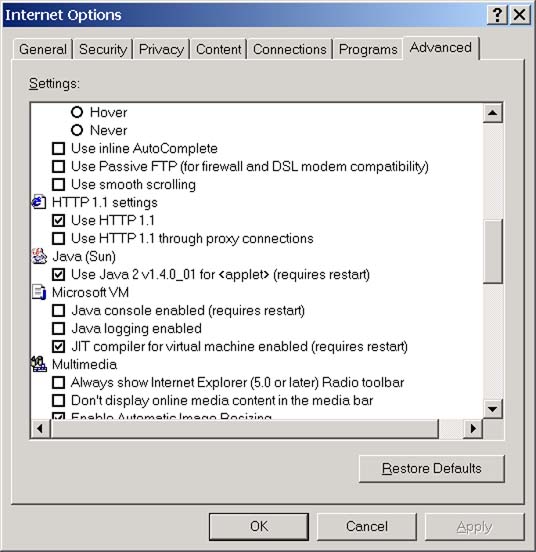
Internet Explorer is configured to use this JRE. To do this,
|
bring up Microsoft Internet Explorer | |
|
click Tools, then Interntet Options, then the Advanced tab | |
|
scroll down to the Java(Sun) section | |
|
ensure that "Use Java ..." is checked for the latest version of the JRE you have installed, as shown in the following snapshot (note: the browser programmers seem to change these views on a whim, so your view may look slightly different than the one shown) |
To obtain and install the Java Advanced Imaging package from Sun Microsystems, navigate to
You may find various options there. Be sure to choose the JRE installation (as opposed to the JDK installation) for your computer and operating system combination. The general steps to follow as of this posting are:
|
Click on the Java(TM) Advanced Imaging 1.1.2 Download link | |
|
Select Windows JRE Install in the drop down box associated with the JRE Install bullet and then click the continue button | |
|
Accept the License Agreement | |
|
Click the download link on the Download Java(TM) Advanced Imaging API 1.1.2 page | |
|
After downloading, double click the downloaded file for automatic installation. |
To obtain and istall the Java Media Frameworks package from Sun Microsystems, navigate to
Select the proper download for your computer and operating system. The general steps to follow are
|
Click the JMF 2.1.1e download link | |
|
Select Windows Performance Pack from the drop down box and then click the continue button | |
|
Accept the License Agreement | |
|
Click the download link on the Download Java(TM) Media Framework (JMF) 2.1.1e page | |
|
After downloading, double click the downloaded file for automatic installation |
The latest versions of JMF should install properly.
If you installed an earlier version it may be that the installation
routine did not place some of the files in the proper directories.
You can check to ensure that the following files
|
jmf.jar | |
|
sound.jar |
are in the folder
\Program Files\Java\j2re1.4.x\lib\ext
If they are not, copy them from
\Program Files\JMF2.1.1e\lib
to the aforementioned folder.
|
Before uninstalling Netscape, be sure that you have another browser available (usually Internet Explorer) so that you can download the new version of Netscape. | |
|
Open the Control Panel folder on your computer. | |
|
Select "Add/Remove Programs" | |
|
From the list presented, click on Netscape to remove it. | |
|
From the list presented, click on the Java Runtime Environment to remove it. | |
|
In your other browser navigate to the Netscape site (use the link above). | |
|
Download and install the latest version of Netscape. | |
|
During the installation procedure for Netscape, do NOT have Netscape install a Java Runtime Environment for you (be sure all such boxes are left unchecked during installation). |
At this point you should have the latest version of Netscape installed and no Java Runtime Environment.
In order to run the Java applets of the hypertextbook project you will need the Java Runtime Environment (JRE) plugin from Sun Microsystems. If you do not already have version 1.4.0 or higher installed on your computer you can navigate to
to obtain the latest version of the JRE. We recommend that you install the latest version in any case. Follow the installation procedures provided on that site.
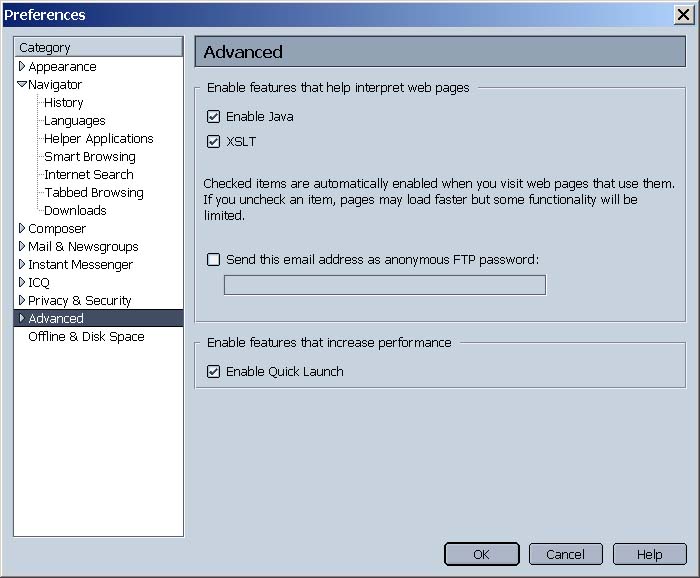
After installing the JRE be sure that Netscape is configured to use
this JRE. To do this,
|
bring up Netscape | |
|
click the Edit tab, then Preferences | |
|
In the window that appears, click the Advanced section | |
|
ensure that the various boxes enabling Java are installed (note: the browser programmers seem to change these views on a whim, so your view may look slightly different than the one shown) |
To obtain and install the Java Advanced Imaging package from Sun Microsystems, navigate to
You may find various options there. Be sure to choose the JRE installation (as opposed to the JDK installation) for your computer and operating system combination. The general steps to follow as of this posting are:
|
Click on the Java(TM) Advanced Imaging 1.1.2 Download link | |
|
Select Windows JRE Install in the drop down box associated with the JRE Install bullet and then click the continue button | |
|
Accept the License Agreement | |
|
Click the download link on the Download Java(TM) Advanced Imaging API 1.1.2 page | |
|
After downloading, double click the downloaded file for automatic installation. |
To obtain and istall the Java Media Frameworks package from Sun Microsystems, navigate to
Select the proper download for your computer and operating system. The general steps to follow are
|
Click the JMF 2.1.1e download link | |
|
Select Windows Performance Pack from the drop down box and then click the continue button | |
|
Accept the License Agreement | |
|
Click the download link on the Download Java(TM) Media Framework (JMF) 2.1.1e page | |
|
After downloading, double click the downloaded file for automatic installation |
The latest versions of JMF should install properly.
If you installed an earlier version it may be that the installation
routine did not place some of the files in the proper directories.
You can check to ensure that the following file
|
jmf.jar | |
|
sound.jar |
are in the folder
\Program Files\Java\j2re1.4.x\lib\ext
If they are not, copy them from
\Program Files\JMF2.1.1e\lib
to the aforementioned folder.
We have been able to run the hypertextbook on Linux platforms and the latest OS versions for the Macintosh. We will provide information for these operating systems in the future. We understand that it works on Macintosh computers with the latest operating system and that it works on Linux platforms as well. You can probably use one of the above installation procedures as a guide for configuring your computer to work properly for viewing the hypertextbook project.