Lab 07: Local DNS Cache Poisoning
Due Monday April 10th @ 11:59 PM
Local DNS Attack Lab
Adapted from SEED Labs: A Hands-on Lab for Security Education.
DNS (Domain Name System) is the Internet’s phone book; it translates hostnames to IP addresses (and vice versa). This translation is through DNS resolution, which happens behind the scene. DNS attacks manipulate this resolution process in various ways, with an intent to misdirect users to alternative destinations, which are often malicious. The objective of this lab is to understand how such attacks work. Students will first set up and configure a DNS server, and then they will try various DNS attacks on the target that is also within the lab environment
The difficulties of attacking local victims versus remote DNS servers are quite different. Therefore, we have developed two labs, one focusing on local DNS attacks, and the other on remote DNS attack. This lab focuses on local attacks.
This lab covers the following topics:
- BDNS and how it works
- DNS server setup
- DNS cache poisoning attack
- Spoofing DNS responses
- Packet sniffing and spoofing
- The Scapy tool
Resources
- Code related to this lab can be found in
07_dns_attacks/of our class’s GitHub repository. - Chapter 18 in the SEED Textbook.
- A related video lecture (Udemy course) recorded by Kevin Du.
BEFORE STARTING: Make sure you PULL the most recent changes from our GitHub repo (git pull)
Environment Setup
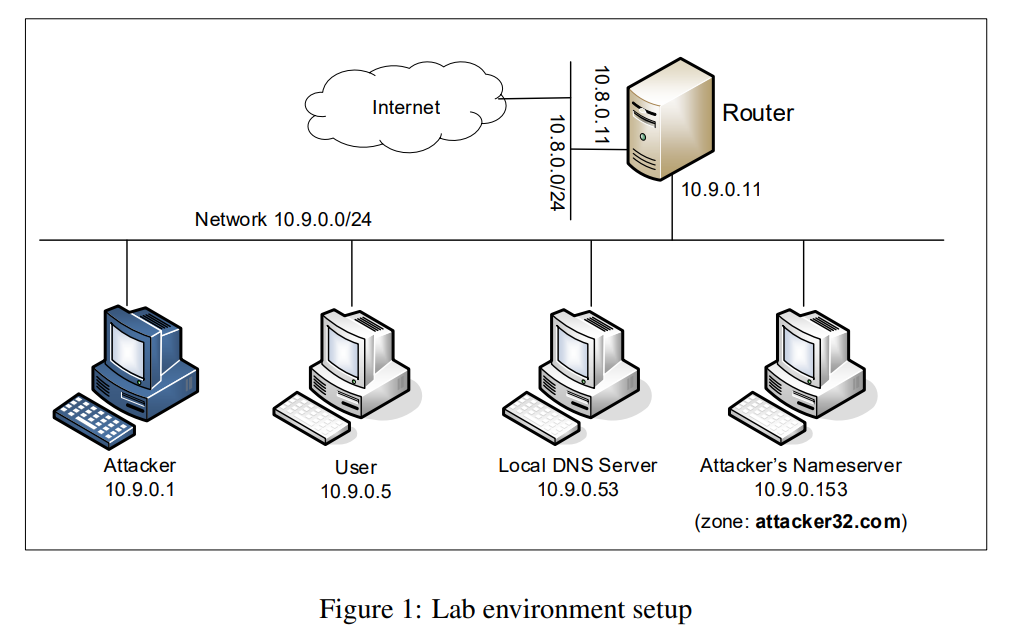
The main target for DNS cache poisoning attacks is local DNS server. Obviously, it is illegal to attack a real server, so we need to set up our own DNS server to conduct the attack experiments. The lab environment needs four separate machines: one for the victim, one for the local DNS server, and two for the attacker. The lab environment setup is illustrated in Figure 1. This lab focuses on the local attack, so we put all these machines on the same LAN.
Container Setup and Commands
Please ensure that you have the class repo cloned locally.
Once this is done, navigate to the 07_dns_attacks/ directory.
For example:
We will make use of Docker and Compose to make working with containers easy.
# First, build the container
  $ docker-compose build    # Build the container image

  # Next, start/stop the container(s) as needed
  $ docker-compose up -d    # Start the container (-d runs container in the background; i.e., detached)
  $ docker-compose down     # Shut down the container
In general for our labs, we will create and start containers that will run in the background
(i.e., use the -d flag when bringing your container up).
At times we may need to run commands on a container — docker makes it pretty easy to attach to a container running in the background and get a shell on that container.
To run commands on a specific container, we first need to use the docker ps command to find out the ID of the container,
and then we can use docker exec to start a shell on that container.
(I told you this would be easy!)
$ docker ps -a   # Show all containers (default shows just running)
  $ dockps         # Show active containers using custom formatting for docker ps
  $ docksh <id>    # Connect to container with <id>

  ### Examples ###

  # The following example shows how to get a shell inside hostC
  $ dockps
  b1004832e275  hostA-10.9.0.5
  0af4ea7a3e2e  hostB-10.9.0.6
  9652715c8e0a  hostC-10.9.0.7

  # Attach to the container with an ID that starts with "96"
  $ docksh 96
  root@9652715c8e0a:/#

  # NOTE: If a docker command requires a container ID, you do not need to type the entire ID string.
  # Typing the first few characters will be sufficient so long as it can uniquely identify a container.
Verifying your Docker setup is correct
Before starting to lab, you should make sure your containers are setup correctly. After starting the docker containers, you will need to log into the user container for 10.9.0.5 using docks, and run a series of commands
First, let’s run the following command to get an IP address of www.example.com. We should get the actual IP address, and the response should come from our own local DNS server 10.9.0.53. Please verify these.
        root@5cfe7ee8a09f:/# dig www.example.com

        ...

        ;; ANSWER SECTION:

        www.example.com.    86400   IN  A   93.184.216.34


        ;; SERVER: 10.9.0.53#53(10.9.0.53)
Second, let’s get the IP address for www.attacker32.com. The result should be 10.9.0.180, which is the IP address of another container in our setup. If you get something different, the environment is not set up correctly.
      root@5cfe7ee8a09f:/# dig www.attacker32.com


      ;; ANSWER SECTION:

      www.attacker32.com. 259200  IN  A   10.9.0.180
Finally, let’s get the IP address for www.example.com, but this time, we will ask the attacker’s nameserver. This is a fake server for the example.com domain, and it will be used in the attack. The result should look like the following: 1.2.3.5 is a fake IP that we put in the zone file. The reply should come directly from 10.9.0.153.
      root@5cfe7ee8a09f:/# dig @ns.attacker32.com www.example.com

      ;; ANSWER SECTION:

      www.example.com.    259200  IN  A   1.2.3.5


      ;; SERVER: 10.9.0.153#53(10.9.0.153)
Lab Tasks
Task 1: Spoofing DNS Responses to the user (10.9.0.5)
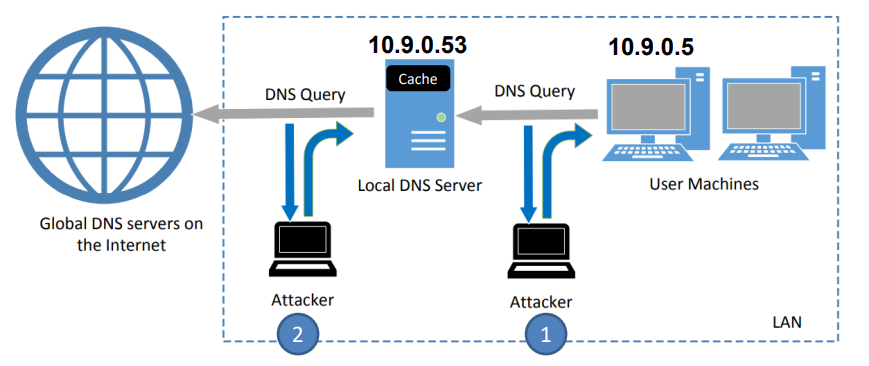
When a user types the name of a web site (a host name, such as www.example.com) in a web browser,
the user’s computer will send a DNS request to the local DNS server to resolve the IP address of the host
name. Attackers can sniff the DNS request message, they can then immediately create a fake DNS response,
and send back to the user machine. If the fake reply arrives earlier than the real reply, it will be accepted by
the user machine. See Figure 2 below).
Figure 2: Attack Surface for DNS Cache Poisoning Attacks
Using the Python script below (also can be found in our course repo), conduct a attack so that the client (10.9.0.5) will accept a spoofed DNS response and use our malicious IP address (1.2.3.4)
It should be noted that in the code above, the value for the iface argument should be
replaced with the actual interface name for the 10.9.0.0/24 network. When you run the Python program via the command line, you also need to provide the IP address of the device you are trying to attack (ie sudo python3 spoof_answer.py 10.9.0.5)
Before launching the attack, make sure that the cache in the local DNS server is cleaned. If the cache
has the answer, the reply from the local DNS server will be faster than the one you spoofed, and your attack
will not be able to succeed. To clear the cache, you can log into the local DNS server container (10.9.0.53) and run the following command:
# rndc flush
While the attack program is running, on the user machine (10.9.0.5), you can run dig command on behalf of the
user. This command triggers the user machine to send out a DNS query to the local DNS server, which
will eventually send out a DNS query to the authoritative nameserver of the example.com domain (if the
cache does not contain the answer). If your attack is successful, you should be able to see your spoofed
information (1.2.3.4) in the reply. Be sure to take a screenshot that shows the response of the dig command having the spoofed IP
Troubleshooting
If you were not able to get task 1 working, then read this section to help troubleshoot your issue.
Task 2: Spoofing DNS Responses to the Local DNS Server (10.9.0.53)
The above attack targets the user’s machine. In order to achieve long-lasting effect, every time the user’s machine sends out a DNS query for www.example.com the attacker’s machine must send out a spoofed DNS response. This might not be so efficient; there is a much better way to conduct attacks by targeting the DNS server, instead of the user’s machine.When a local DNS server receives a query, it first looks for the answer from its own cache; if the answer is there, the DNS server will simply reply with the information from its cache. If the answer is not in the cache, the DNS server will try to get the answer from other DNS servers. When it gets the answer, it will store the answer in the cache, so next time, there is no need to ask other DNS servers. See Figure 2.
Therefore, if attackers can spoof the response from other DNS servers, the local DNS server will keep the spoofed response in its cache for certain period of time. Next time, when a user’s machine wants to resolve the same host name, it will get the spoofed response from the cache. This way, attackers only need to spoof once, and the impact will last until the cached information expires. This attack is called DNS cache poisoning.
Conduct the same attack as task 1, but instead of targeting the user machine (10.9.0.5), you will ned to target the local DNS server (10.9.0.53) Before attacking, make sure that the DNS Server’s cache is empty. You can flush the cache using the following command:
# rndc flush
If your attack is successful, you should be able to see your spoofed information (1.2.3.4) in the reply. Be sure to take a screenshot that shows the response of the dig command having the spoofed IP
You can inspect the cache on the local DNS server to see whether it is poisoned or not. The following commands first dump the cache into a file, and then display the content of the cache file. Be sure to take a screenshot that shows that the spoofed DNS response got stored in the cache of the local DNS server.
# rndc dumpdb -cache cat /var/cache/bind/dump.db | grep example.com
Task 3: Spoofing NS Records
In the previous task, our DNS cache poisoning attack only affects one hostname, i.e., www.example.com. If users try to get the IP address of another hostname, such as mail.example.com, we need to launch the attack again. It will be more efficient if we launch one attack that can affect the entire example.com domain.The idea is to use the Authority section in DNS replies. Basically, when we spoofed a reply, in addition to spoofing the answer (in the Answer section), we add the following in the Authority section. When this entry is cached by the local DNS server, ns.attacker32.com will be used as the nameserver for future queries of any hostname in the example.com domain. Since ns.attacker32.com is controlled by attackers, it can provide a forged answer for any query. The IP address of this machine is 10.9.0.153 in our setup.
Our goal for this task is to insert a spoofed NS record into the cache of the local DNS server
;; AUTHORITY SECTION: example.com. 259200 IN NS ns.attacker32.com.
Using the Scapy Python script below, conduct the attack and verify that you were able to inject a spoofed NS record into the cache of the Local DNS server.
Task 4: Experimenting with /etc/hosts
/etc/hosts is a file on the Linux OS that holds static IP mapping for domain names. If the user needs to find an IP address for a domain name, it will first check for a match in /etc/hosts. If the domain name cannot be found in this file, then it will issue a DNS query to the internet.This file is only writeable by root (hopefully it makes sense why), so we need to run the command sudo su root to log into the root account on our VM.
After logging into the root account, open up /etc/hosts in a text editor and add the following line:
9.9.9.9 www.csci476.com
That will add a static IP mapping for the domain www.csci476.com, so that whenever someone wants to visit www.csci476.com, it will use the IP address listed in /etc/hosts.
Make sure you save your edit. Now, issue a dig command for www.csci476.com and verify that the IP address from /etc/hosts was used. You should issue this dig request on the VM (NOT while inside the container)
Once you complete this task, you should remove that line from your /etc/hosts file :-)
Submission
Submit your assignment as a single PDF to the appropriate D2L dropbox
The lab report is to help me see that you did the lab and followed the instructions. For each task, you should include a screenshot to show you completed the task. If the task asks you to write down observations, you should also include those in your lab report. For the tasks that requires you to do some thinking and find ways to exploit a program, you should write a brief description about your approach and the steps you took to get your output. This is a lab report taken from a previous offering of this course. This is a good example of how you should format your lab report: https://www.cs.montana.edu/pearsall/classes/spring2023/476/labs/SampleLabReport.pdf